Mounting Files.com via WebDAV on Windows


Our preferred solution for mounting Files.com as a drive on Windows is to use the Files.com Desktop App.

In a very small number of situations, it may not be possible to use the Desktop app for a given use case. In those situations, another approach is to mount Files.com as a drive using WebDAV.

Mapping The Network Drive

Open Windows Explorer by going to Start > Computer or pressing Windows + E on your keyboard. Then click Map Network Drive. Your computer may look different depending on what version of Windows you're using.

Input https://SUBDOMAIN.files.com/ where SUBDOMAIN is your Files.com subdomain into the folder field. Then check the connect using different credentials box and click Finish.

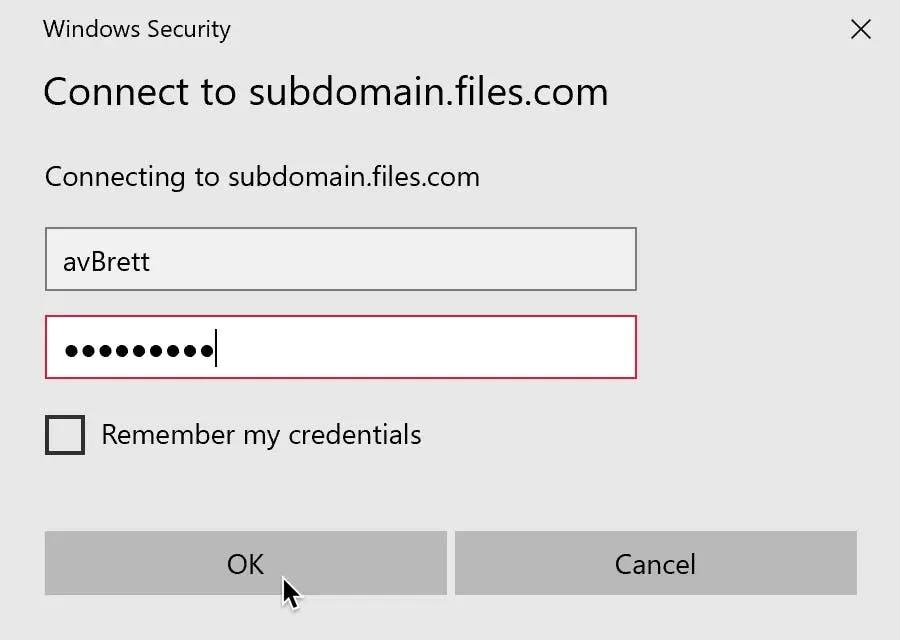
On the next screen enter your Files.com username and password then click OK.
If all was entered correctly, Windows Explorer will now show the files on your site. You can now browse and access it as any other drive, including via drag and drop.

Troubleshooting WebDAV on Windows

Below are some potential issues that Windows users may encounter when connecting to Files.com via WebDAV, along with recommended steps to resolve them.

Not to sound like a broken record, but these issues are one of the reasons that we prefer not to recommend WebDAV in the first place. Consider this one more plea to use the Files.com Desktop App instead.

Unable to Map Drive on Windows 7

One common issue that Windows 7 users encounter with WebDAV is the lack of proper encryption support for making secure WebDAV connections (TLS 1.2 to be specific).

Microsoft provides instructions for enabling TLS 1.2 support in Windows on the Microsoft Support site.

We recommend using the Easy Fix download solution published there, rebooting, and then trying the drive mapping again.

Large Uploads (taking over 30 min) Are Failing

By default, Windows will not allow a WebDAV upload that takes over 30 minutes. Microsoft provides instructions for making a registry setting change to address the issue in their archived article (see Scenario 2).

Downloads Over 50MB Are Failing

Windows has a default limit of 50MB for WebDAV downloads. Microsoft provides instructions for making a registry setting change to address this issue in their archived article (See Scenario 1).

Some Files/Folders Are Not Visible on WebDAV Mapped Drive

The Windows operating system has a path length limit of 260 characters. This means that if you have a path that exceeds that limit, Windows will not display any files or folders within that path, even though the files will appear in the Files.com web interface.

You can read more about this Windows limitation in this Microsoft article.

One way to work around this OS limitation is to shorten your folder names, or rearrange your folder hierarchy to reduce the length of your folder paths. You may also consider using the Files.com desktop app, which works around this OS limitation.

WebDAV Drive is Not Automatically Reconnected After Reboot

According to this Microsoft KB article, this behavior is by design in Windows.

In Windows 7 Basic authentication cannot be persisted by the Credential Manager in Windows 7, this is new to the OS. The only way with Basic authentication mode to reconnect is to disconnect the drive and reconnect again, because WinHttp is not able to retrieve saved Basic and Digest credentials.

The workaround they suggest is to use a logon script that reconnects the DAV share at user logon. Here is an example, where Z is the drive letter to map to, your_username is your username, and your_password is your password:

net use Z: https://app.files.com /user:your_username your_password

WebDAV Mapped Drive Capacity Reported Different Than Expected

This is normal behavior for WebDAV mapped drives on Windows, as explained in this article in the Microsoft knowledge base.

You can always see your actual usage in the web interface at the Usage page.

"Windows cannot access..." Error

This error may occur when attempting to map a network drive if the Windows WebDAV client service is not currently running on your machine.

To check this, follow these steps:

  1. Launch the Windows Services Manager (run: services.msc)
  2. Locate the WebClient service in the list of services, and verify that its status is listed as "running". If not, double-click on the service, and then click the Start button under Service status.
  3. To ensure that the service is started automatically on boot, you can also change the Startup type to "Automatic".
  4. Finally, click OK and then close the Services Manager window.

Then try the drive mapping again after ensuring the service is running.

Unable to Map WebDAV Drive on Windows Server

If you are using a Windows Server operating system, such as Windows Server 2008 or later, you need to install the Desktop Experience feature to enable support for WebDAV drive mapping.

To do so, use the following steps, as documented by Microsoft:

  1. Start the Windows Server Manager.
  2. In the tree view, highlight the Features node.
  3. In the details pane, click Add Features.
  4. In the Add Features Wizard, check the Desktop Experience box, and then click Next.
  5. Click Install.
  6. When the Add Features Wizard has finished, click Close.
  7. Click Yes when promoted to restart the computer.

Receiving Error Message "Error 0x800700DF: The file size exceeds the limit allowed and cannot be saved"

This is caused by a default security setting in Windows that was introduced in Windows XP SP2, and is present in all subsequent versions of Windows.

Here is the explanation from Microsoft:

This issue occurs because a security change that was introduced in Windows XP SP2 affects the Web Distributed Authoring and Versioning (WebDAV) redirector. This security change makes sure that an unauthorized server cannot force a client computer into a denial of service attack. If you try to download a file that is larger than 50000000 bytes, the client computer interprets this download as a denial of service attack. Therefore, the download process stops.

Microsoft does provide a resolution, which involves making a registry setting change. You can find the details in their documentation under "Resolution".

Get Instant Access to Files.com

The button below will take you to our Free Trial signup page. Click on the white "Start My Free Trial" button, then fill out the short form on the next page. Your account will be activated instantly. You can dive in and start yourself or let us help. The choice is yours.

Start My Free Trial

©2024 Files.com. All right reserved

FILES.COM

  • Start My Free Trial
  • Pricing
  • Docs
  • API and SDKs
  • Contact

CONTACT & SUPPORT

support@files.com

(800) 286-8372

Monday–Friday

9am–8pm Eastern